Different from the L10 Pro this robot requires we install Valetudo using fastboot. This method is quit janky and its rather easy to brick the robot by simply taking too long to complete the process. If we don’t finish the rooting before the watchdog reboots the robot it can end up in a bricked state.
Testing Hardware
- A factory default Dreame D10s Pro Robot Vacuum
Tools required
-
Mini Usb cable
-
Dreame Breakout PCB
-
A pc/laptop with wifi
-
A pry tool (optional)
Software required
-
A laptop or pc running Debian
-
A hacked version of LiveSuite: GitHub - Hypfer/valetudo-sunxi-livesuit
-
The latest LiveSuite Image for your model: https://builder.dontvacuum.me/nextgen/dust-livesuit-mr813-ddr3.img
-
The ‘Valetudo helper bridge’ (a mini webserver) which can be obtained here: Releases · Hypfer/valetudo-helper-httpbridge · GitHub
Preparation and Recon
-
Make sure your vacuum is switched off but fully charged.
-
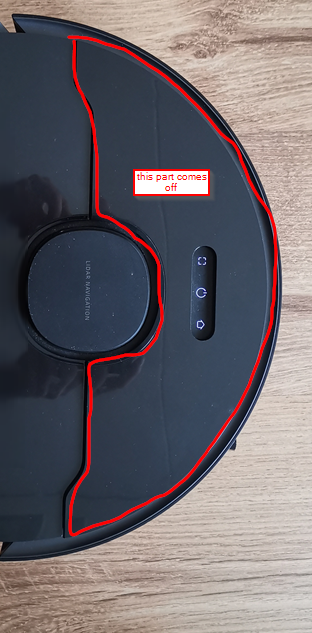
Remove the vacuum top panel using the pry tool or just your fingers. Quite a lot of force was needed on my vacuum but it should come off eventually:
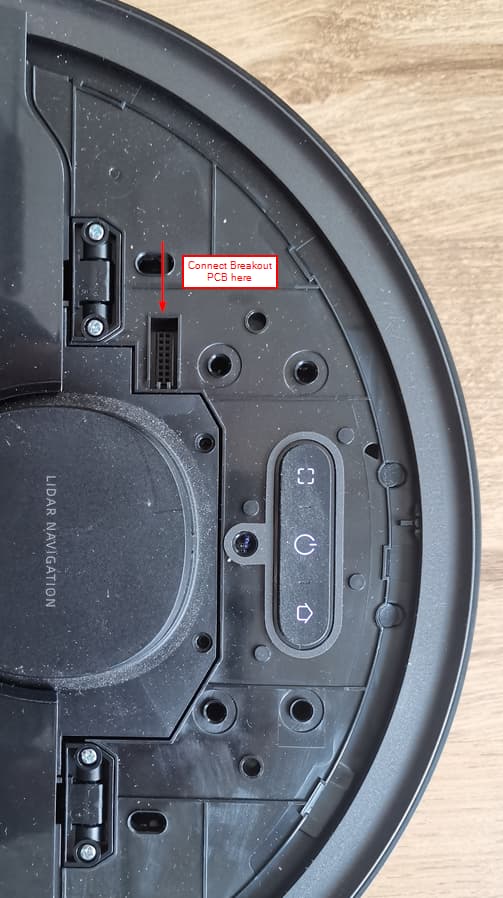
- Connect the breakout PCB to the debug port of the vacuum with the USB port facing out from the vacuum:
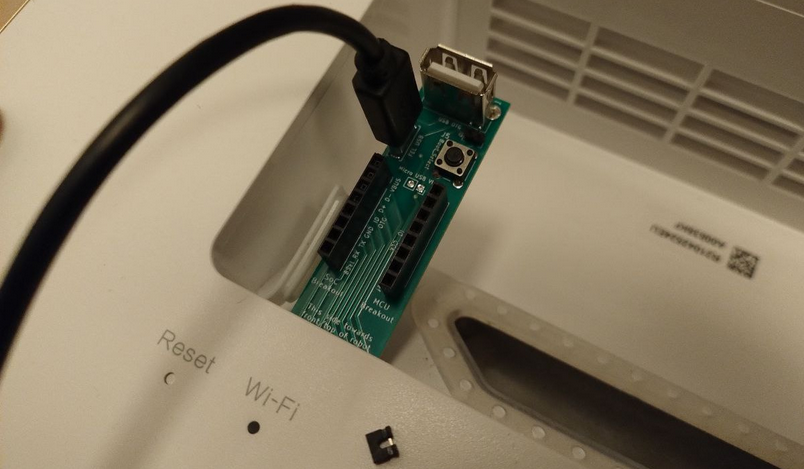
- Connect the Debian laptop to the pcb with a mini usb cable:
-
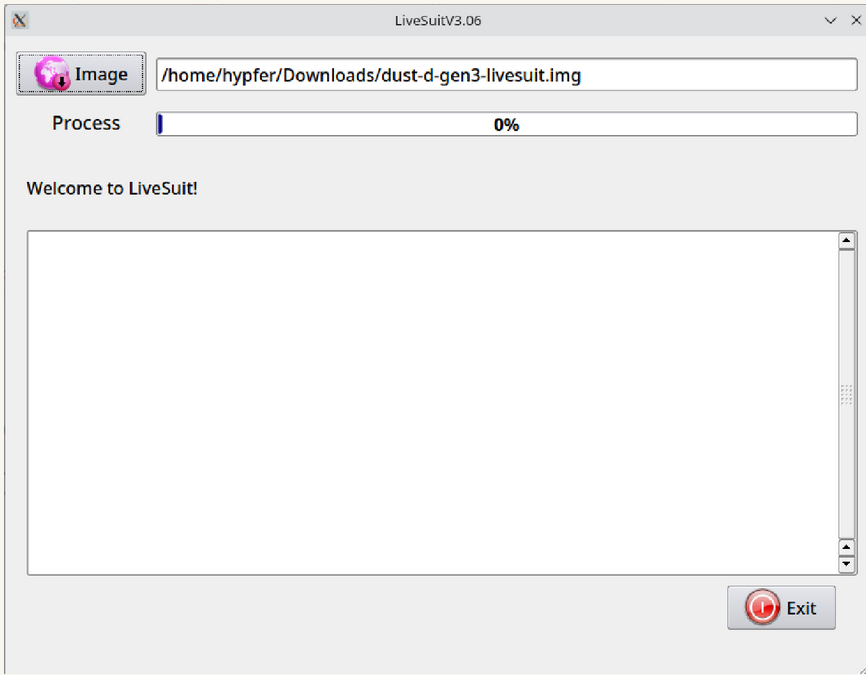
Run LiveSuite and select the image obtained above:
-
Next we’ll enter fastboot.
- Press and hold the button on the PCB.
- Then, press and hold the power button of the robot. Keep pressing the button on the PCB.
- After 5s, release the power button of the robot.
- Continue holding the button on the PCB for 3 additional seconds.
The button LEDs of the robot should now be pulsing. With that, plug the USB cable into your computer. LiveSuit should now display this message box:
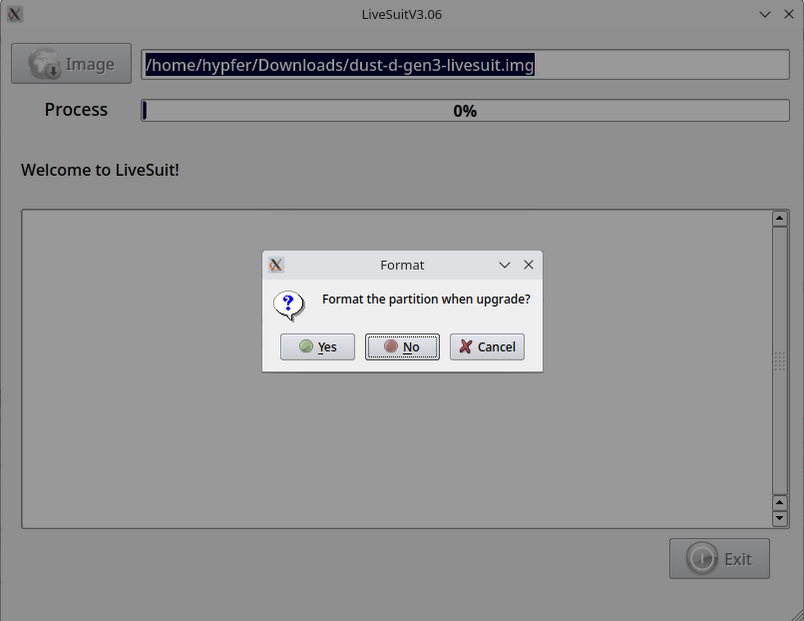
Click no. This should now have booted your robot into Fastboot. To verify that, open a new terminal and run fastboot devices.
- If you see your robot, continue with
fastboot getvar dustversion
root@T420:/home/hypfer# fastboot devices
Android Fastboot        fastboot
root@T420:/home/hypfer# fastboot getvar dustversion
dustversion: 2024.07.00
Finished. Total time: 0.003s
IF YOUR DUSTVERSION IS LOWER THAN 2024.07.00 IT CANNOT BE ROOTED
- If everything is fine so far, next step is to collect the config value:
root@T420:/home/hypfer# fastboot getvar config
config: 836064ae31f4806c844f708ab8398367
Finished. Total time: 0.215s
Copy the config value somewhere as we’ll need it later.
- Further recon
For disaster recovery and to support us determine which changes are required for which config value, you will need to sample about 0.8 to 1.2GB of data from the robot.
During this process the robot may reboot depending on how quick you are. At this point that’s not an issue yet. Simply boot back into fastboot using the same process as before and continue where you left off.
To start sampling, execute fastboot get_staged dustx100.bin.
This will create a file named dustx100.bin in the current directory.
Ensure that it is about 400MB in size using du -h dustx100.bin.
root@T420:/home/hypfer# fastboot get_staged dustx100.bin
Uploading 'dustx100.bin'                           OKAY [ 37.898s]
Finished. Total time: 37.898s
root@T420:/home/hypfer# du -h dustx100.bin
400M    dustx100.bin
If it is, continue to the next step with fastboot oem stage1 and fastboot get_staged dustx101.bin
root@T420:/home/hypfer# fastboot oem stage1
                                                   OKAY [  0.000s]
Finished. Total time: 0.000s
root@T420:/home/hypfer# fastboot get_staged dustx101.bin
Uploading 'dustx101.bin'                           OKAY [ 38.173s]
Finished. Total time: 38.173s
root@T420:/home/hypfer# du -h dustx101.bin
399M    dustx101.bin
Once done, again check the filesize using du -h dustx101.bin.
As you can see in the example, it being only 399MB is okay. It should be around 400MB.
Then, finally, run fastboot oem stage2 and fastboot get_staged dustx102.bin
root@T420:/home/hypfer# fastboot get_staged dustx102.bin
Uploading 'dustx102.bin'                           OKAY [ 37.992s]
Finished. Total time: 37.992s
root@T420:/home/hypfer# du -h dustx102.bin
399M    dustx102.bin
Same check for being ~400MB in size applies here as well.
With that done, zip up everything and store the file in a safe place
root@T420:/home/hypfer# zip dreame_rxxxx_samples.zip dustx100.bin dustx101.bin dustx102.bin
  adding: dustx100.bin (deflated 0%)
  adding: dustx101.bin (deflated 0%)
  adding: dustx102.bin (deflated 0%)
root@T420:/home/hypfer# du -h dreame_rxxxx_samples.zip
1.2G    dreame_rxxxx_samples.zip
Build the firmware image
Because there’s a hardware watchdog that will reset your robot and the dustbuilder firmware build takes some time, press and hold the power button for 15s to turn off the robot for now. Also, unplug the USB cable from your laptop.
If you don’t do this, you risk bricking the device if it gets rebooted during the install procedure.
Now that you have the correct config value for your robot, head over to the dustbuilder and build a new firmware for your robot. Make sure to select Create FEL image (for initial rooting via USB).
If building a firmware fails with “Error: invalid config value.”, unfortunately, your rooting process has to be paused for now.
Take the zip file created in the previous step, head over to https://check.builder.dontvacuum.me/ and upload it there.
The guys at Valetudo will take a look.
Phase 2: Rooting
Now that we know everything we need to know, we can continue with flashing the rooted firmware image.
Prepare for rooting
Once the firmware build has finished, download your dreame.vacuum.rxxxx_xxxx_fel.zip to the laptop and unpack it. Navigate the second terminal for fastboot into the folder containing the contents of that zip file.
Close LiveSuit and open it again.
Select the newly generated image from the zip named _dreame.vacuum.rxxxx_phoenixsuit.img. Open the check.txt and copy the content into your clipboard.
Using that newly generated image(!) enter fastboot once more. Remember that once in fastboot, you will have 160s to finish the procedure before the watchdog reboots the system, leaving it in a possibly bricked state.
Root the robot
Once the robot is back in fastboot, run fastboot getvar config to start the procedure.
Then, run fastboot oem dust <value> with <value> being the one you’ve copied from the check.txt.
Fastboot should confirm this action with OKAY. If it doesn’t, DO NOT PROCEED.
Next step is to run fastboot oem prep.
Fastboot should confirm this action with OKAY. If it doesn’t, DO NOT PROCEED.
Next step is fastboot flash toc1 toc1.img.
Fastboot should confirm this action with OKAY. If it doesn’t, DO NOT PROCEED.
With that done, secure boot should be defeated. But rooting isn’t done and the timer is still ticking. Continue by flashing the boot and rootfs partitions.
fastboot flash boot1 boot.img
fastboot flash rootfs1 rootfs.img

fastboot flash boot2 boot.img
fastboot flash rootfs2 rootfs.img
This can take a few seconds and may also print an error message like Invalid sparse file format at header magic. You can just ignore that one.
BUT as with the commands above, fastboot should confirm all of this with OKAY. If it doesn’t, DO NOT PROCEED.
Finally, run fastboot reboot. If it boots up normally, you have successfully rooted your robot.
If it doesn’t, please open a VAERS ticket at vaers.dontvacuum.me or ask for support in the support groups.
Phase 3: Install Valetudo
With the rooted firmware installed, we finish the procedure by installing Valetudo to it.
For that, first, check the Supported Robots page and look up which Valetudo Binary is the right one for your robot.
Once you know that, download the latest matching Valetudo binary to your laptop: https://github.com/Hypfer/Valetudo/releases/latest/download/valetudo-{armv7,armv7-lowmem,aarch64}
With the Valetudo binary downloaded, head over to GitHub - Hypfer/valetudo-helper-httpbridge: Utility webserver and download a matching binary for your laptops operating system.
Now, connect the laptop to the Wi-Fi Access Point of the robot.
You should be able to connect to it via ssh. Do that now and keep the shell open: ssh -i ./your/keyfile root@192.168.5.1
The next step is to start the utility webserver. Open a new terminal and run the ./valetudo-helper-httpbridge-amd64 binary Don’t close that window until you’re done. The server will create a new www directory right next to itself as well as print out a few sample commands explaining how to download from and upload to it.
Make sure that it is listening on an IP in the range of 192.168.5.0/24 and then copy the downloaded valetudo binary to the newly created www folder. Remove the {-aarch64,lowmem,..} etc. suffix. It should just be called valetudo.
Important:
Before you continue with the rooting procedure of your robot, please make sure to create a backup of your calibration and identity data to allow for disaster recovery.
The easiest way of doing this is by creating a tar archive of everything important and then uploading it to your laptop, which at this point should be connected to the robots Wi-Fi AP.
To do that, use the ssh shell to create a tar file of all the required files like so:
tar cvf /tmp/backup.tar /mnt/private/ /mnt/misc/
Then, look at the output of the valetudo-helper-httpbridge instance you’ve started previously. It contains an example curl command usable for uploading that should look similar to this one:
curl -X POST http://192.168.5.101:1337/upload -F 'file=@./file.tar'
Change the file parameter to file=@/tmp/backup.tar, execute the command and verify that the upload to your laptop was successful. If everything worked out correctly, you should now see a backup.tar with a non-zero size in www/uploads.
If you’re experiencing issues, make sure that you’ve specified the correct port.
After uploading the backup and storing it in a safe place, you can now download the valetudo binary that you’ve previously put in the www directory. valetudo-helper-httpbridge will tell you the correct command, which should look similar to this:
wget http://192.168.5.101:1337/valetudo
After downloading the Valetudo binary, finish the install by running these commands on the robot:
mv /tmp/valetudo /data/valetudo
chmod +x /data/valetudo
cp /misc/_root_postboot.sh.tpl /data/_root_postboot.sh
chmod +x /data/_root_postboot.sh

reboot
- After installation connect to the vacuum IP address in a browser to connect it your home LAN and setup maps etc.